Navigation Nodes and Routing
Left Navigation Node#
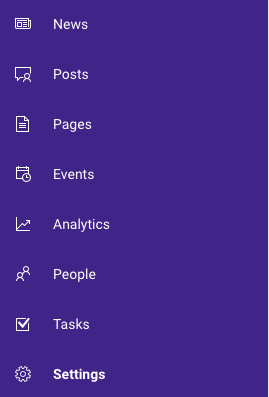
Reach plugins can hook into the left navigation sidebar. See the "Tasks" node in the screenshot below:
Configuration#
Left navigation nodes are configured in an extension with an area of type Page. This can be configured in the definition.json file.
The route property specifies the path segment that will be used to serve the provided React component.
In the example below the TaskRoutes component will be rendered under the path https://reach.livetiles.io/<handle>/tasks.
The navigationNode property defines how the node should look in the left navigation.
The navigationNode property is used to describe the left navigation entry:
| Property | Type | Description |
|---|---|---|
label | string | Defines the label displayed next to the icon in the navigation node. |
translations (optional) | object | This key value pair is used to provide translations. Each key represent a language country code (like "en") while the value represents that language's translation of the navigation node (like "Tasks"). If a language cannot be found it will automatically fallback to the value of the label. |
iconName | string | Defines the friendly name of a Fluent UI icon (formerly office ui fabric). Browse Icons |
Custom Navigation Node#
You may want to conditionally render the navigation node or even render a custom component in the left navigation bar.
In order to have a custom rendered component for your plugin's navigation node, we have to make a small change in the definition.json file.
For each navigation node you may specify a componentName which will be rendered instead of the default NavigationNode from Reach.
As an example we will modify the tasks-plugin to render our own navigation node:
Removing the other properties from the navigationNode is not required as anything you have here will be passed down through a specific property.
The next step is to create a component with the same name as we specified for the componentName under navigationNode.
This component will behave the same way as any other component used for your plugin. That means you will need to export it in your index.ts file so it can be picked up by Reach.
By setting this component as a custom navigation node, we get access to a special property named navigationNodeProps.
This property will contain all the neccesary properties required to render the default Navigation Node from Reach.
Let's take a look at an example, where we want to conditionally hide the navigation node:
Here we read the value of showNavNode from the plugin settings (for more information see: settings) and depending on it's value we either render the node or not.
In the example above we decided to render the default Navigation Node from Reach. For this we use the component named PageMenuActionItem which is exported from @reach/chrome.
We have to pass in the navigationNodeProps so the component knows how to render our navigation node.
Routing#
Reach plugins can include sub-pages as part of the Page extension areas.
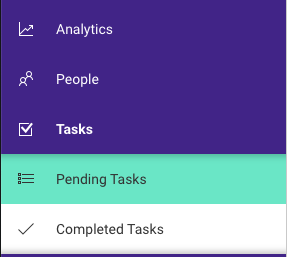
These sub menu nodes are defined via the Page component exported from @reach/chrome.
The Page component accepts an optional property submenuContents. Sub nodes can be rendered with NavLinkSidebarItem components:
After we've defined the left navigation and its target routes, we now need to set up the actual routing, to match URLs with page components like the PendingTasksPage from the example above.
This is done via a react-router configuration. Reach already bundles an instance of react-router and react-router-dom which can be used in plugins. In order to setup routing we need to define routes via the Route component and access the current URL via the useRouteMatch hook.
Please refer to the React Router documentation to read more about how to setup the routing.
You can check out the full example on GitHub.